Hi Max
"...1) Presently, the snow effect begins at the top, with nothing, and then slowly fills the screen as the snow falls. Is there any way to have the snow already falling when the clip begins?..."
One of the faults with both Snow and Snowflake effect is that the parameters cannot be used with keyframes. "Snow" cannot be increased from no flakes to a blizzard in one clip. Owing to the effect being basically a scroll means that the screen starts with no snow which then falls as the clip progresses. I have mentioned this to NCH in the past. (In fact I suggested the possibility of snow just after last Christmas following a flurry of questions regarding how one could do it. ..At the time it could be simulated by creating a scrolling text screen of full stops and ** 🙂)
However despite the limitations, in reply to your question. You can, with a bit of fiddling start with the snow already falling. Here is the basic idea....You will need to adjust the parameters to suit your particular needs of course. Use the Snow effect rather than Snowflakes as the latter, although you can make them sway etc. are largely empty space sprites and therefore won't green screen very well. (Although check it out by all means ...)
Proceed then as follows...
Place a black blank image on Video track 1
Extend it to 20 seconds
Click the FX Add a Snow effect with the following parameters: (These are simple example values but work reasonably)
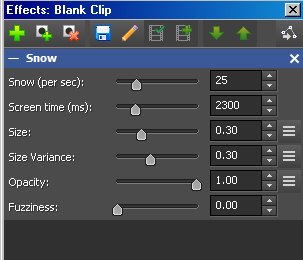
Export the clip (e.g.as Snow.mp4) and then clear the timeline.
Load the background clip to Video Track 1
Load the exported "snow" clip to Video Track 2
Split Video Track 2 at the point where the falling snow fills the screen (around 4 seconds or so from the start) and delete the left hand section.
Close the gap.
Add a Green Screen effect to the "snow" clip on Video Track 2 using black as the target colour.
Set the Threshold value to 0. (Otherwise the "snow" may not be seen)
Add a short fade in at the start of the "snow" clip if required.
By adding a speed change to the clip the "snow" can be made to fall faster or slower. By dragging "snow" clip from the timeline to the clip bin you can create a copy. Drop the clips back on separate overlay tracks. (which retain their transparency .re-add the fade in) and by staggering the starts of the different clips on each overlay track you can increase the "snow" gradually
".....2) Presently the snow only falls vertically. Is there any way to have it fall at an angle? Such as: you are inside a car that is travelling. The snow falling outside should be falling at a steep angle........"
Having created your "snow" clip you can follow the steps above adding a Green Screen as described but also add a Rotation effect to alter the angle of the snow. This however reduces the area of the clip so you will also need to add a Scale effect but only to the Horizontal component so it now stretches to fill the screen from side to side. This will work OK but the "flakes" cease to fall down now. In effect the "scroll" is horizontal. It's probably best therefore to limit the angle to around 30 degrees or so. (or the complimentary angle from 360) Try these settings for all three effects...
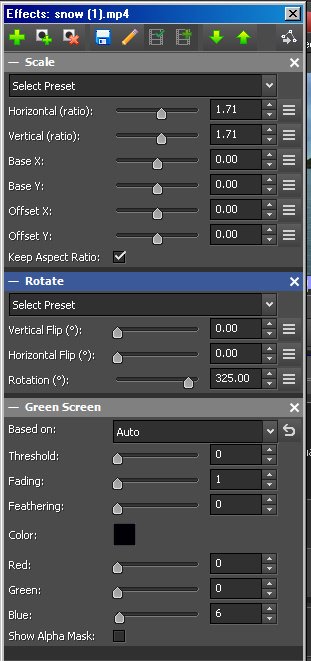
".....3) Is there a way to have the effect continue from one clip to the next without interruption, such as when I want to fade between to similar images......."
As you are using a Video Track 2 clip in these suggestions ---a "snow" clip that is identical throughout, it can be easily overlayed onto as many Track 1 clips as required. It can also be lengthened by adding copies of itself as many times as required as mentioned above.
Hope this helps
Nat